Monday, 2 May 2016

Flying the London Helicopter Routes

To small planes the whole of London, from Docklands in the east to beyond Heathrow in the west, is a no-go area. With Heathrow's airspace, and London City's, and restrictions over the centre of London, almost everything inside the M25, except for fringes to the north and south, is closed.

Helicopters, though, are a different story. Because of their ability to land engine-out in a very small space and without risking damage on the ground, they are permitted on a small number of carefully planned routes that provide an out along their entire length - mostly in open spaces, except for central London where it is the river. These routes allow you to fly all along the Thames, from Chiswick to Greenwich, as well as directly overhead Heathrow airport. Considering how protective the UK is, it is astonishing - but true - that you can fly over Heathrow in the tiniest of single-engine helicopters, the Robinson 22. But you can - there are even videos on Youtube.

I'd wanted to do this for a long time, and finally a trip to England provided the opportunity. I booked a Monday morning flight with EBG Helicopters at Redhill Aerodrome (EGKR), in one of their Robinson 44s, so my son could come along too. I'd previously flown there in their Guimbal Cabri G2 (G-ETWO - geddit?). That was a very interesting introduction to a new (to me) type, but we didn't go very far from the field.

I'd prepared for the flight by studying the helicopter route chart, available from Pooley's, and reading what I could find on the web, e.g. this. From the south, the most interesting routes are H9, which runs dead straight from the A3 to just south of Heathrow at Bedfont, and then north to the A40 at Northolt. That is followed by a stretch of H10, along the A40 then turning right onto the North Circular Road (A406) to the river. There is a lot of IFR - I Follow Roads (or Rivers) - involved in this. H10 joins up with H4 (via a short stretch of H3), snaking along above the Thames from Kew through the centre of London to the Isle of Dogs. South and east of there, you can do what you want, relatively speaking anyway. H7 provides an alternative route north from Redhill straight into H4 if you don't want to fly over Heathrow.

Over the weekend, the forecast was not good, and I was afraid I'd have to cancel. But the morning dawned with blue skies. It clouded over by the time of our flight but never worse than 2500 overcast, plenty for this trip.

The first challenge is finding the aerodrome. Redhill has to be the hardest to find in the whole world, despite being only a couple of miles from Gatwick and sandwiched in the corner of the M25 and the M23. I'd been there before so had a rough idea, but was still very grateful for the data roaming package on my phone as I followed a succession of single-track country lanes and narrow roads through housing estates.

Once you find it, Redhill is a very interesting place. It's home to many of London's helicopters, including the Surrey Police, an air ambulance, Sky's ENG ship, and a good selection of expensive-looking executive machines. It also has a couple of grass runways but I've never seen a fixed-wing operation there - I think the runways must be waterlogged a lot of the time.

Briefing for the flight was simple enough - no flight plan or other permission is required. A quick call to Heathrow's ATC confirmed that they were taking H9 transitions, and then we jumped into G-PAMY to start our adventure: me, my son Joe, and my instructor for the day. It would be crazy to try a flight like this for the first time without someone who has done it plenty of times before. I asked him to take care of the radio calls since there are plenty of unfamiliar visual reporting points, and I'm not 100% comfortable with the differences between UK and US radio practice.

After takeoff our first call, crossing the M25, was to Heathrow Special. This sounds an odd name, to me anyway. All non-airline flights in Heathrow's airspace are done under Special VFR (SVFR), which is essentially VFR flight under IFR-like control. I did this once before flying from White Waltham to Stapleford, though I never got anywhere close to the airport. Heathrow Special is a dedicated frequency for such flights. They cleared us as far as the Bedfont holding point, at "approved altitude".  Every segment has an approved maximum altitude on the chart, sometimes changing every couple of miles, and you are expected to have this information to hand.


Close to Bedfont we were handed off to Heathrow Tower - a first for me and, unless I do this again one day, the only time. They were very friendly and helpful, despite handling the two busiest runways in the world as well as a pesky helicopter. There had been some concern about how long we'd have to hold, one of the guys at Redhill mentioned holding for 20 minutes and then again for 15 minutes between the runways. We had plenty of fuel and the view is excellent, so it wouldn't have been a problem, but it didn't happen. We were instructed to wait for one landing aircraft, which we did hovering at 1000 feet just south of the 27L runway numbers. Joe got several excellent shots of the arriving Air Canada 767. Once it was on the ground we were cleared to proceed across both runways, having hovered for less than a minute. The view was absolutely spectacular, along the whole length of Heathrow. I'm using to flying past San Francisco, and have even landed at LAX, but this was really extraordinary. There was a long line of departing aircraft, with a BA Airbus 380 at the tail. In fact I counted 5 A380s on the ground - a significant proportion of the entire fleet.

Once north of the airport, we went back to talking to Heathrow Special as we admired the collection of bizjets at Northolt - no evidence there that it is still owned and operated by the RAF. Soon we reached the Thames at Kew. The river is surprisingly twisty and quite hard to follow accurately, even though I slowed down to 60 knots - partly for manoeuvrability but mainly to enjoy the view. And the view was fabulous. With Battersea heliport below to our right we could see right across London, with Chelsea and the Royal Albert Hall off to our left. (At home we joke that Albert is plane spotting from his memorial, writing down the tail numbers of the airliners on long final into Heathrow in his royal notebook - this was probably the first time he logged G-PAMY).


Further on we got a very special treat - our timing coincided exactly with the Changing of the Guard at Buckingham Palace, giving us a spectacle of the Household Cavalry as well as the massed tourists in front of the palace. From the same location we also got an excellent view of the Houses of Parliament, Big Ben, Westminster Abbey and then Whitehall and Downing Street. I once had the good fortune to attend a meeting inside No 10 (the Cabinet Room, no less, though the occasion was much less exotic), but I'd certainly never seen it from this angle.

By now we were talking to City Airport tower, and they had us hold just short of Tower Bridge. We had a tailwind so hovering wasn't a great idea - instead we made a tight turn over the river and returned to Westminster Bridge, giving us a magnificent second showing of central London. Sadly we only got one turn around the hold, before City cleared us to proceed overhead Tower Bridge, following the twists of the river until the exit point of H4 at the southern tip of the Isle of Dogs.

From here it was a simple straight flight back over Croydon to Redhill, with a glimpse along the way of the remains of Croydon Airport, London's main airport before the War. All that's left is the terminal, a pre-war airliner in front of it, and about 200 feet of the runway.

Back at Redhill I demonstrated an autorotation to Joe - the common belief is that helicopters drop out of the sky if the engine fails, but in fact a power-off landing in a helicopter is much safer than in a plane since you only need a very small space to touch down. The aircraft descends quickly, but under complete control, and at about 40 feet above the ground you flare to slow down and stop the descent, then drop gently to the ground, cushioning the final drop with the remaining energy in the rotor.

From there it was a short hover in a challenging crosswind back to EBG's base, and we said goodbye to G-PAMY. Though not to Redhill, since we stayed for lunch at the excellent airfield cafe. The food is very good, but the best part is the toilets - or rather the walk to get there, which takes you around three sides of a hangar filled with unusual and vintage aircraft, including the only remaining specimen of the 1932 Spartan Arrow.

It was a wonderful trip, so good in fact that I'm awfully tempted to do it again when I'm in England again! There are lots more pictures from the trip here.

Tuesday, 9 February 2016

Offroad in Anza Borrego: Coyote Canyon

The first part of our journey is here.


We arrived in Borrego Springs just in time to go to the visitor center there. By good luck we spoke to the same lady as a few years back, who has loads of offroad experience there and was very happy to give us updates about the state of all the trails. In fact the park even produces a frequently-updated summary of them. This is in sharp contrast to Death Valley, where all the visitor center will tell you is "we don't recommend the such-and-such trail" - so you're on your own to go try it, which I suppose isn't that bad.

We'd already read about many trails in the park in Backcountry Adventures: Southern California. This book, and its companions, are an incredible wealth of material - not only detailed descriptions of hundreds of trails, but masses of background information about the region, the wildlife, the people, and just about anything. There are plenty of trail guides (I have all of them!) - but these are the best.

Her advice was to start with the Coyote Trail, so we did. It leads to the north, starting past the huge orange groves, which seem out of place in the desert. At one time you could take it all the way through to the LA basin, but now there's a stretch in the middle which is closed making it into two in-and-out trails. At first it's an easy, sandy track, which we took on our first visit in an ordinary rental car, to walk up the amusingly-named Alcoholic Pass. The octotillos were just beginning to bloom. After a while the trail
crosses back and forth over a stream. Apparently it can get quite deep - I'd taken the precaution of noting exactly how deep I could  go (just up to the top of the wheel rims) - but after the dry winter it barely got FJ's tires wet.

The challenging part comes immediately after that, a steep, rocky stretch a few hundred yards long. FJ barely even noticed - I didn't even engage low gear - but it's certainly the end of the road for rental cars and regular SUVs. Once at the top, the view suddenly opens out into the huge expanse of the Collins Valley. It's one of those times when you are really glad to have FJ - there is absolutely no other way to get here other than a multi-day hike.

There is one main track through the valley, but many interconnected side trails so you can do a lot of exploring on wheels. We saw a few cars on the main trail, and a couple of parked vehicles at the trailheads, but we pretty much had the place to ourselves. Our favourite spot was Salvador Canyon, with a very luscious spring, and high up in the hillside, a cluster of palms just like the much more famous and much more visited Palm Canyon.


The last couple of miles of the valley are very rough, and we wondered whether it was worthwhile. Our doubts were removed at the end, at Middle Willows. A fence very definitely ends the drivable trail. We walked a little further upstream, in the direction that once led right through to Anza Canyon. The spring is very lush, completely hidden by dense vegetation. It's a beautiful place.

It was mid-afternoon by the time we returned. There was just time to explore the Truckhaven Trail. This is the original road from Borrego Springs to the Salton Sea, built in the 1920s by the local farmers who needed a way to get their produce out. Much of the time it goes through sandy washes, but even so it would be a challenge in a Model T or a primitive truck of the period. And from time to time it suddenly scales a canyon wall. The worst part is a recent bypass around a washout. From the description in the guide I wasn't sure I'd be able to manage this, but FJ barely noticed, chugging up the 30% grade at a walking pace. It's short but spectacular, leading over the top a ridge and then an equally steep grade back down into the next canyon.

That just left us time to get to Fonts' Point before sunset. This is a spectacular overlook which can, with care, be reached in a rental car (I know!). There is a panoramic 360 degree view, but the most intriguing part is right at your feet, the badlands, square miles of low hills and canyons made of dried mud. Each time I've been there I've wondered what it would be like to be down amongst them. This time, as I'll describe later, we had the means to find out.

That evening we went for dinner at the only "fine dining" restaurant in the area, the Butterfield Dining Room at the Casa del Zorro, a couple of miles outside the town. The food was good and so was the wine, and the service was friendly and unpretentious, which we always appreciate. The ambiance was rather spoiled, for me anyway, by what seemed to be a group of long-since retired salesmen, completely dominated by their ex-boss who was only too happy to share his old-fart, reactionary opinions on everything with the entire room. There times when it is an advantage not to be a native speaker!

Monday, 1 February 2016

Offroad in Anza Borrego: Getting There

We've been to the Anza Borrego park a couple of times before, but we never had a proper 4x4 so there was a lot we couldn't explore. This time we drove there in our Toyota FJ, giving us the ability to go absolutely anywhere legal.

To make the journey there more interesting, we decided to repeat our journey of a few years back along the San Andreas fault. You can stay within a few miles of the fault all the way to New Cuyama on route 166.  The route is 200 miles long from Hollister to New Cuyama, and there is no gas anywhere along it. I was glad to have an extra 5 gallons of the stuff in the can on FJ's roof.


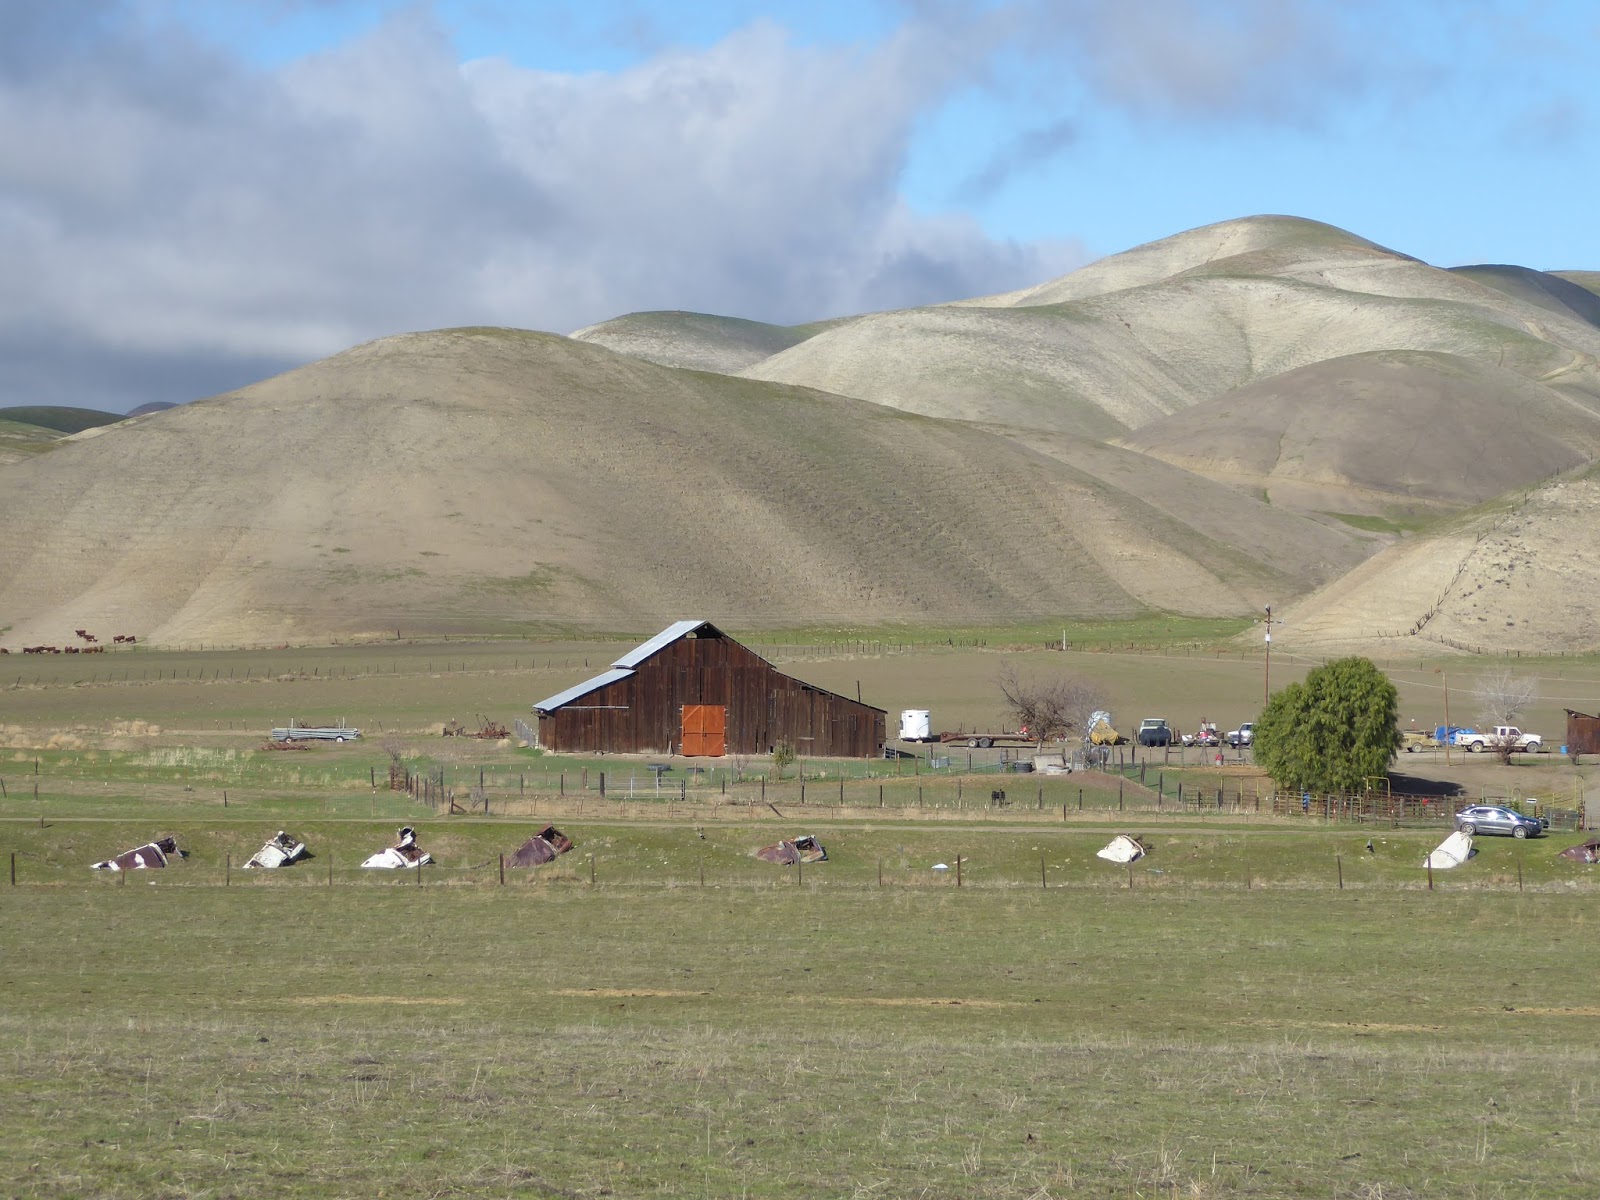
The first part of the route passes along the eastern edge of the Pinnacles, on route 25, a beautiful road with almost no traffic. One oddity: towards the southern end it crosses a river, and along the river bank there are a dozen or so 1950s cars buried, nose first. Why? I couldn't find anything about this on the web, so short of going and knocking on the door of the farm house, there's no way to find out.

After that you have to deviate from the fault for a while - there used to be a road that ran along it, but no more. This takes you over the Parkfield Grade, a steep and twisty road whose last few miles are dirt. It's easy when it's dry, but it was muddy this time and I was very glad
we had FJ.

Parkfield is a very strange place. It's right on the fault, and there's an earthquake research center there. There's also a cafe, where we hoped to get a hot drink, but it was closed for renovations. There's a hotel, too, very rustic with a huge fireplace, everything made from great logs, and a collection of books to read to while away the evenings going back to the 1950s.

Since we couldn't get anything to drink in Parkfield, we stopped at the restaurant by the James Dean Memorial on route 46. This was the only open place of any kind along the entire route. They do a mean fruit pie! Where the employees live, I have no idea - the nearest town is Paso Robles, over 20 miles away.

We last drove this route about ten years ago. There used to be a closed, boarded up general store in the middle of nowhere between route 46 and route 58, but this time there was nothing left of it except a patch of bare earth. How on earth did the store ever make a living from the occasional ranch in this desolate countryside?

A few miles more brought us to the Carrizo Plain, with its giant 250 megawatt solar energy plant. Further on is dried-up lake bed. This is very visible from the air, even from an airliner at 30,000 feet. The day's weather was strange, with a dark overcast and occasional showers, and very cold too. It's an incredibly desolate place, made even more moonscape-like and spooky by the unusual late afternoon light.  In the middle of the most desolate stretch of all, we came upon two cars full of kids blocking the road. Just as I wondering how to deal with this, one of them backed up, leaving a gap. What they were up to, we had no idea - maybe a drug deal? But the nearest town of any size is over 50 miles away.

As we finally reached a proper road again, it started to snow. That was really a surprise. We were very glad to get to New Cuyama. It's not much of a place, but it's the only settlement of any kind for 30 miles one way and 50 the other. And it has a gas station! - although when we arrived, only one pump was working.

There's also a hotel and restaurant, the Buckhorn. There's even an airport, or at least a runway - it closed a few years ago, but the new owners, who also refurbished the hotel, reopened the runway. I guess it makes a good $100 hamburger destination for people in LA. We spent a pleasant evening there, with a giant burger for dinner accompanied by an excellent margarita, finished by watching some local guys play pool.

Friday, 16 October 2015

Flying the Bay Tour

A friend of mine asked me the other day for tips about flying a Bay Tour - an aerial tour of San Francisco and the surrounding area. I've done it so many times that it's routine, including all the things ATC can do to make it more challenging. But it's true that if you've never done it, it's pretty daunting. I was lucky since, flying out of Palo Alto as a student and ever since, I got to practice it all with my instructor. There are some articles on the web about it, but they all seem to leave out some of the wrinkles you may need.

First, what is a Bay Tour? There is no "official" definition. If you tell Norcal you want a Bay Tour, they'll assume you're going to fly from wherever you are to downtown San Francisco, taking in the Golden Gate bridge and Alcatraz somehow along the way, then loop back in the same general direction as where you came from. There are no official routes (except generally-used transitions through the SFO Class B).

You can fly over downtown San Francisco and the Golden Gate without talking to anyone, but that doesn't make it a good idea. For one thing there is often a lot of traffic, especially if it's a nice day. And you'll be a bit constrained as to what you do afterwards. You can certainly do it without transitioning the SFO Class B, if that makes you uncomfortable, by crossing the bay and transitioning Oakland instead.

Starting from Palo Alto, I like to fly across the hills to the coast and fly up towards and over Half Moon Bay, before crossing the bridge, looping round Alcatraz, fly over the city then transition past SFO and back home. If the light is especially pretty, I'll do a loop around the bridge, Sausalito and the Marin headlands, and maybe another over the city. That takes 50 minutes or so and has been much appreciated by many, many visitors and friends.

Alternatively, it's possible to do the SFO transition outbound, or even both ways. If the coast is socked in, this is the best way. I'll talk about both.

There's nothing scary about the Class B transition, but you need to have a good radio technique. If you sound hesitant or the controller feels there's any risk that you won't do as you're told, all you get is "remain clear of Class Bravo." You'll be mixing it with airliner traffic at one of the busier airports in the country, in a very complex airspace. The last thing anyone wants is to have to divert a jet with 500 people on it, just because some Cessna driver gets confused. A few years ago there was a conflict between a departing 747 and a Bay Tour, which made it into the newspapers. There was never any danger, but not surprisingly it has made the SFO controllers a lot more careful.

Before you even get to the airport, you'll want to check the weather. It's best on a perfectly clear, cloud-free day, but you can't count on that, especially if you have visitors who aren't here for long, so you may need to compromise. If the ceiling is anything above 4000, you can do everything described here, though the pictures won't be as pretty. Often there's an overcast along the coast. The city of San Francisco is notorious for its micro-climates, so you can have heavy overcast at the coast, yet brilliant sunshine a mile inland. Webcams can be helpful in planning all this.

So... let's suppose you're taking off from PAO, or arriving from somewhere further south, and you want to fly the "Bayshore transition" northbound towards the city. From PAO, you'll ask for a "straight out departure for Bay Tour". They may come back and say "SFO is not accepting transitions at this time." In that case there's another technique, which I'll come to later. But let's suppose they are OK with it.

On takeoff, you'll fly just to the west of 101 (aka the Bayshore Freeway, though I don't think anyone who isn't in ATC has called it that for decades). You'll fly at 1500 feet or so, and get handed off to San Carlos tower (119.0). They in turn will hand you off to SFO tower (120.5), and direct you to remain clear of Class B. That's a tricky bit, because you don't have much time to get a word in edgeways with them and get clearance into Class B. You have to be prepared to do 360s in the fairly narrow space between SQL's airspace and the to-ground part of the Class B, while trying to talk to SFO tower. Visually, the latter starts just beyond the San Mateo bridge, so it's easy to stay clear.

Eventually, you'll hear the magic words "cleared into Class Bravo", along with an altitude (usually 1500 or 2000) and "remain south and west of the Bayshore Freeway". Now you can potter northwards while your passengers gasp with amazement as you pass almost within touching distance of the 777s and 380s on the ground.

The normal runway usage at SFO is 1L/R for takeoff, and 28L/R for landing. There is no conflict with this. However really heavy planes (i.e. those going to Asia and Europe) use 28L/R for takeoff. If one of these departures is happening, you'll either be told to remain clear, i.e. to continue to fly circles just before the bridge, or given some kind of hold, typically a left 360. Very occasionally, you may be directed to fly mid-field over the airport - which is pretty amazing to do.

Once you're well clear of the 28 runways, you'll be told "own nav" and handed off to Norcal (135.1). There can be a lot of traffic over the city - tourists like yourself as well as sightseeing flights including the helicopter and a seaplane which operates out of Moss Beach. Norcal will call traffic but they may not be talking to everyone so you need to be really eagle-eyed.

It's up to you what you do now. I generally fly at 2000, which gives me an out at least to get to water if the engine stops. It also keeps you legal over the downtown area (remember, 1000 feet above the highest point within 2000 feet). You can fly a circle or two over downtown, head out around Alcatraz, then over to the Golden Gate bridge and maybe a circle there.

Now for the alternative. If you come from further south, you'll typically be higher (3500 or so) and talking to Norcal on 135.65, the SFO approach frequency. You'll never talk to SFO tower. If you get told "transition not available", then this is what you need to do. So you ask PAO for a left Dumbarton departure with handoff to Norcal. Then, when you get handed off to 135.65, you ask for a Bayshore transition at 3500. Generally (I've never been refused in decent VFR conditions) they will clear you into Class Bravo and "climb and maintain 3500". They may tell you to fly over 280 rather than 101 - the difference is only a couple of miles. The advantage of being this high is that there is no possible conflict with departing airliners.

As I mentioned, I prefer to fly over to the coast and overhead Half Moon Bay. For this you need to be on the KHAF CTAF (122.8). Unfortunately that frequency is shared with Watsonville and several other nearby airports, so it can get busy and squeally. Fly overhead KHAF at 1500, self-announcing and keeping a very careful eye out for arriving and departing traffic. You could go higher, but you'll need to be below 1500 feet in just a few miles, so there's no point.

It's common to have a layer of cloud over the ocean and sometimes over the coast. Often, the tops are so low that you can safely and legally just fly over it. If not, you should not use this route. Or if you decide to take a look and see, be prepared to turn around and head back overhead 92 towards San Carlos, give them a call (119.0), and then proceed as described above.

If you look at the SFO Terminal chart (and you had better study it pretty carefully), you'll see that there's a tiny segment carved out of the SFO surface zone off the coast at Pacifca, with a 1500 foot floor. This is so you can stay close to the coast while the notoriously under-powered Convair 440s take off from 28 at SFO. No, there haven't been any of those for several decades, but nobody has told the airspace designers. Modern jets are already comfortably at 3000 feet by the time they cross the coast. But anyway you have to stay below 1500 - I generally go for 1300 to be on the safe side.

As you fly into this sliver of airspace, call Norcal on 135.1. This goes something like "Norcal approach, Cessna 12345 entering the Pacifica transition at 1400 for Bay Tour and return to Palo Alto." They will give you a squawk and say something like "remain clear of Class B, notify when you are ready to return to Palo Alto."

You can do the whole thing at 1500 feet, but once clear of the Pacifica transition I prefer to climb to 2000, once again to stay for-sure legal and to give me better engine-out options. Flying over the Golden Gate bridge is a sure-fire passenger pleaser, and quite often I'll loop around to the left over Sausalito and back round over the Marin Headlands, to give them (and me) a second chance for the pictures. Once again, keep a very careful eye out for traffic. If it's a nice day (and why would you be doing this otherwise), there will be plenty.

Eventually, you'll want to return. Stay tuned to 135.1 the whole time, but don't call anyone until you've finished flying in circles and ready to head straight back. Then call Norcal and say "request Bayshore transition for return to Palo Alto [or wherever]". Usually they will clear you into Class B and hand you off to SFO tower (120.5). If they refuse, it's time, again, to request a transition at 3500. As long as there are no clouds, this will just about always be granted. They'll clear you into Class B and climb you to 3500 or 4000.

This can always be complicated by heavy departures from SFO 28. Sometimes, SFO tower will have you fly circles over the stadium at Candlestick Park (currently - stadiums change owners fairly frequently), or right 360s just before San Bruno mountain. If you're at 3500 you may get heading changes to keep clear of this traffic. It's always very impressive to have a 747 or, lately, an Airbus 380 taking off practically across your nose.

Whichever altitude you choose, you'll be told to stay south and west of the Bayshore Freeway (maybe overhead 280 if you're higher). You potter down past the airport, watching the heavies come in from Asia and Europe and counting the 380s on the ground. Once you're getting close to the San Mateo bridge, you'll be handed off to San Carlos (if low) or 135.65 (if high). And then the excitement is over.

An alternative route is to cross the Bay, staying north of the Bay Bridge, and then transition overhead Oakland. Sometimes you'll be given this, though it's always worth asking about the 3500 foot transition. In this case you'll start by talking to Oakland north tower, then handed off to south tower (the airliner part of what is really two separate airports that share only a name). They'll take you overhead the 30 numbers at 2000, before descending to 1400 to fly down the Bay staying well clear of SFO's Class B.

I've flown this route, or variants of it, over 50 times, and it is always a pleasure, and always a little different. And that's not to mention the few times I did it in the helicopter, overhead the city at 1000 feet and 50 knots and even once under the Golden Gate bridge, which believe it or not is perfectly legal in a helicopter.

Sunday, 2 August 2015

The Garden Railway: Ruby the Live Steam Engine

In anticipation of my grandson's visit, I thought it would be fun to add live steam to the collection of motive power for the garden railway. You can spend a lot of money on live steamers, but that wasn't what I was looking for. The Accucraft Ruby is a little 0-4-0, a "proper" steam engine with real valve gear, and affordable. I found one on eBay and a few days later, it showed up, very pretty in its bright red paint. It wasn't covered in oil, and didn't bear the scars of high-speed derailments, so I'd say it had never been run.

I should start with an executive summary of the garden railway live steam experience. It doesn't last long, it's completely unpredictable. It is certain that you will get painful burns. It's fun, and my grandson loved it. It is absolutely not to be confused with running a railway, even a model one.

First, though, there are supplies to be obtained. Distilled water and butane are available at True Value (the ubiquitous hardware store), no problem there. But steam oil (needed for the cylinder lubrication)... not so obvious. Probably any heavy oil would do, but to be safe I ordered some from Accucraft. Their minimum order is four half-pint bottles. The engine uses less than one cc per run. I have enough to last for about 500 years.

Getting the engine running is pretty easy. Plenty of 3-in-1 oil on all the moving parts (no risk of over-lubrication here), fill the butane tank, top up the lubricator, and put 80cc of water in the boiler. This needs a tiny funnel to fit the ~5/16" (8mm) hole. Then put it on the track and light the burner. So far, no excitement.

It takes about five minutes for the boiler pressure to reach the 30 psi working pressure, once I got the hang of setting the burner valve. Then the excitement begins.

Before the engine will run, the cylinders have to be "primed". This means getting them hot enough that the steam doesn't condense, and the only way to do that is to pass steam through them until it stops condensing. The technique is simple, if spectacular. Put the engine into forward gear and push it along the track, turning the wheels. A fountain of near-boiling oily water shoots a couple of feet into the air, covering everything in the vicinity in a painfully hot shower. Never do this wearing clothes you care about! Once the water evaporates, the oil stains are permanent.

Then you drag the loco backwards lightly, without turning the wheels, and repeat until the fountain of hot water is replaced by a jet of soggy steam. Now, you're ready to see some live steam action!

The regulator (the valve that controls the flow of steam to the cylinders) rotates through about 180 degrees. But practically speaking, it has two settings: stopped and supersonic. There's maybe one degree of movement between them. Oh, and a substantial delay between opening and it and seeing the effect.

Sooo... you open the regulator very slowly until, with a gentle push, Ruby just begins moving on her own. Very slowly she chuffs down the track. It's immensely satisfying. The instructions say she should never be run faster than a scale walking pace - say a few inches per second, and that's exactly what she is doing. Until she is just out of reach... when a steam-age miracle occurs and she switches to supersonic mode. Traveling at something like a scale hundred mph, she corners amazingly well on the four-foot radius curves of my main line, disappearing rapidly down the long straight parallel to the pool.

But it can't last, and on the next curve or the one after she flies off the track, landing on her side. If you've managed to get this far without sustaining second-degree burns, you certainly will now. Steam, boiling water and burning butane are spewing in all directions, and everything you can touch is burning hot. Ignoring everything, she has to be picked up by her wooden buffer beams - the only part that won't deliver instant burns - and restored to the track. If she falls on her left-side, the butane valve has probably closed as well, since it sticks out to the left when open. This means opening the near-red-hot smokebox door (I still have the scar on my thumb) to relight the burner.

Out of five runs, I did just once get her to tour the whole railway and keep going without ever derailing. She was still going way faster than the instructions say (I think they are just a tease), but she managed to stay on the track. She lasted for about five minutes before the butane tank emptied, puffing along slower and slower on her small reserve of steam.

She has simple pin-and-link couplings, incompatible with any rolling stock I own. But it doesn't matter, because there really wouldn't be much point in giving her a train - it would just be more to fly off on the corners, and to rerail afterwards.

She has little metal footsteps on each corner. I don't understand why, but just one of these bends every time she derails, so it fouls the track. And of course it's burning hot, and you can't get any purchase anywhere else to straighten it out. The solution was to remove it. Her pretty red paint is scratched and scraped on every corner, from her frequent derailments, and she is covered in a thin film of the oil that she sprays everywhere as she runs.

So that was our live steam experience. Zac loved it, but now that he has returned home, I doubt that Ruby will be getting another outing for a while. It was fun while it lasted. And it has certainly removed any temptation to spring $2500 for a live steam scale model of a Shay.

Monday, 25 May 2015

The Garden Railway and WiFi for the Arduino

The railway has taken a back seat for the last few months, thanks to a hectic period at work as we tried (successfully, we think anyway) to find more funding, not to mention lots of work on the product.

But with Zac's visit only a couple of months away, it was time to get everything working again and even try to make some progress on the automation.

No trains had run for several months, and the rails were filthy both with black oxidization and with general garden gunk. Mr Bouncy, the LGB track cleaner, made a valiant effort but even so the trains wouldn't run smoothly. I gave up and went round the track with a hand sander, which got everything nice and shiny.

Foolishly, I'd left all the electronics outside over the winter, protected from rain and sun but still exposed. But after a few problems it all came back to life again, and the trains were running.

The plan has always been to automate the railway, so all the trains run in turn under computer control. There's already a little automation, to control the reverse loops at either end of the line. That is done strictly with a couple of boxes full of miniature relays. While it's always fun to figure out how to do things this way (ever since I read how the Post Office built the telephone network), running several trains is beyond what's reasonable.

My original idea had been to do everything with one or more Arduinos, with train detectors connected to the inputs and motor shields to operate the LGB point motors. An RS-232 connection to the NCE controller would control the trains. For a simple fixed-function controller this can easily be done. But figuring out the NCE commands from the limited documentation was a real pain.

That was when I thought, JMRI has already done this. It's a comprehensive framework for building control panels, operating all the different DCC control systems, and a bunch of other things too. It allows control scripts to be written in Python (well, actually the Jython dialect, but for most purposes they're the same).

But that means getting train detector information back to JMRI. DCC is superb for controlling trains and accessories, but its great weakness is that it has no way to feed information back. NCE has a proprietary way to do it, but it means running separate wires which kind of defeats the object.

The Arduino is a good way to collect data from a bunch of sensors, but somehow it has to get back to the controller. WiFi seems obvious, but when I started this WiFi shields cost several times more than the Arduino itself. JMRI supports an RS-485 two-wire based protocol called CMRI, and that looked promising. I bought the necessary parts but programming it seemed tricky so it didn't get very far.

By the time I picked up this project again, you could get Arduino WiFi shields based on the TI CC3000 chip for $11.95 on Ebay - Chinese ripoffs of the Adafruit card, which use the same software library. The CC3000 has a complete TCP/IP stack on a chip, as well as the WiFi hardware. This is really the ideal solution, especially for remote locations like the far-end reversing loop.

But when I tried to connect it, nothing happened. I have two WiFi systems at home, one running the old security standard WEP and the other the newer one, WPA. After some messing around - the WEP password has to be presented explicitly as a series of hex bytes - I got the actual WiFi connection to work. But no further. For some reason it would not use DHCP to connect to the router itself.

I took the setup to work the next day. With the WPA2 network there, everything worked fine and the example program did exactly what it should. So at least I knew that the hardware and library worked. But back home, nothing. Running Wireshark showed that the Arduino never transmitted a DHCP request. The only difference between the two networks was WEP versus WPA.

Eventually I convinced it to connect to my other network - the trick is to tell the CC3000 that it's WPA2, even though it is actually WPA. And then - it's a miracle! - DHCP got an address, and my test program worked. Conclusion: the CC3000 doesn't work with WEP. It manages to connect, but probably it gets something wrong in the encryption of data packets, so they can't be read correctly.

Along the way I realised that for the sensor input, JMRI was just getting in the way. My intent had been to use its JSON facility to communicate sensor information, which in turn can be interrogated by the script. But a much better way is to use JSON to control the trains, using JMRI just as a translator to NCE-speak. That way my Python code can run as a standalone program, receiving input from the Arduino(s) directly.

So now, the Arduino sends a UDP message to a well-known broadcast address every second, or whenever a sensor changes, with the current state of all the sensors. I found a nice webpage which explains how to listen for multicast messages from Python.

Now I just need to finish the rest of the code and install the sensors, and I'll have an automatic railway at last. If only the trains would stay on the track - but that's another story.

Update 5/25/2015

Well, I spoke too soon. The CC3000 board I'm using is a reliability disaster. It worked kind-of OK for a while. Then for a while it wouldn't execute DHCP correctly, getting stuck halfway through the message exchange (never sending a Request). Now today it does DHCP OK but resets the whole Arduino when connectUDP is called. It looks as though the chip itself is a Chinese ripoff as well as the board - there is no TI logo on it. I've ordered a "real" one from Adafruit, at nearly four times the cost. I hope that works. I've tried with and without external power, so that isn't the problem.

Update 6/3/2015

The Adafruit CC3000 shield did indeed fix most of the problems. DHCP works reliably at least some of the time. It still isn't perfect though - it often takes a board reset before it will work, and sometimes a power cycle. I'm not sure how this is going to work out for my garden railway application.

The resets were due, I eventually realised, to not having enough data memory. There is only 2K bytes, and if there isn't enough, the stack collides on its way down with the static data, resulting in mayhem. I put the static data structures on a diet and the problem has gone away.

Update 6/4/2015

OK, I give up. The Adafruit shield was better than the Chinese one, but nowhere good enough to be usable. It comes up maybe one time in four. The WiFi and DHCP exchange generally look OK with Wireshark, but the microcode mostly doesn't get to the point where you can send messages successfully.

Just bought a 25 foot USB cable... not as elegant or convenient, but there's a limit to how much time I'm willing to spend on what is obviously a very broken piece of silicon (or software for it).

Tuesday, 3 February 2015

On LinkedIn Invitations

I'm not particularly well known, but I've been in fairly visible positions in companies large and small for most of my career, so inevitably I get "invitations" on LinkedIn pretty regularly.

I'm pretty liberal about accepting these - after all LinkedIn is all about maintaining a sound professional network. Anyone I've ever worked with, or even who I could have worked with but maybe never got to know, is fine. It's not like Facebook, which I limit to real-life friends and acquaintances - maybe I haven't seen them in a very long while, but at some point I could have gone for a beer or a coffee with them, and I still would happily if the opportunity arose.

But actually most of these "invitations" come from people who not only I've never heard of, but even after I look at their profile I have no idea why they've suddenly decided to get in touch with me. Maybe they think I might give them a job or put some work their way, maybe they have some other reason.

Yet they invariably come with the default LinkedIn text "I'd like to connect with you on LinkedIn". I'm sure you would, otherwise you wouldn't have sent me an invite, but why? Wouldn't it be nice to take the time to say, "I see you were at XXX a few years ago and so was I, right now I'm looking around for a new opportunity and I thought you might be able to help".

Or, "My company makes widgetators and from your role, it looks as though you might sometimes need them."

Or, "I'm a recruiter and I like to have thousands of people in my LinkedIn contact list even though you'll probably never hear from me." (I get quite a few of those, if you have "recruiter" in your title or role you can reasonably presume that I will not accept your invite unless I know you personally).

Or even, "You have no idea who I am and to be honest I have no idea who you are either, but I like to have a huge list of contacts and I pulled your name from a hat today so I thought I'd send you this invite".

Sending the default invite text is not only lazy and impolite, it's also self defeating. If I've never heard of you and you give me absolutely no reason why you want me to add you to my contact list, what on earth makes you think I'm going to accept it?